Asset Management - Installation & Setup
Install and configure the Asset Management module on your Odoo instance. The module includes demo data to help you explore features immediately.
Prerequisites
Before installing, ensure you have:
- A working Odoo 17, 18, or 19 Community Edition instance
- The following modules installed: Contacts (base), Products, Employees (hr), Accounting (account), Inventory (stock), Discuss (mail)
- Admin access for initial setup
Module Dependencies
| Module | Technical Name | Purpose |
|---|---|---|
| Contacts | base | Users, groups, permissions, company settings |
| Products | product | Link assets to product records |
| Employees | hr | Departments, employees for transfers |
| Accounting | account | Invoice linking for purchases and maintenance |
| Inventory | stock | Stock locations linked to asset locations |
| Discuss | mail | Chatter, message tracking, activities on transfers |
Installation Steps
- Download the
asset_managementmodule from the Odoo App Store or SDLC Corp. - Upload to your addons directory and navigate to Apps then click Update Apps List.
- Install by searching for "Asset Management" in the Apps menu and clicking Install.
After Installation
Once installed, a new top-level Asset Management menu appears with the following sections:
- Dashboard - Real-time KPIs and analytics
- Assets - Kanban/list/form views for all asset records
- Vendors - Supplier management
- Transfer - Assignment tracking
- Maintenance / Repair - Service logging
- Depreciation - Financial entries
- Configuration - Types, Tags, Locations
- Reporting - 10+ chart and pivot views
The module loads demo data including 5 asset types, 5 tags, 4 vendors, 6 assets, 4 transfers, 2 maintenance records, and 2 depreciation entries so you can explore features immediately.
Initial Configuration
1. Configure Asset Types
Navigate to Asset Management > Configuration > Types to set up your asset categories and depreciation rules.
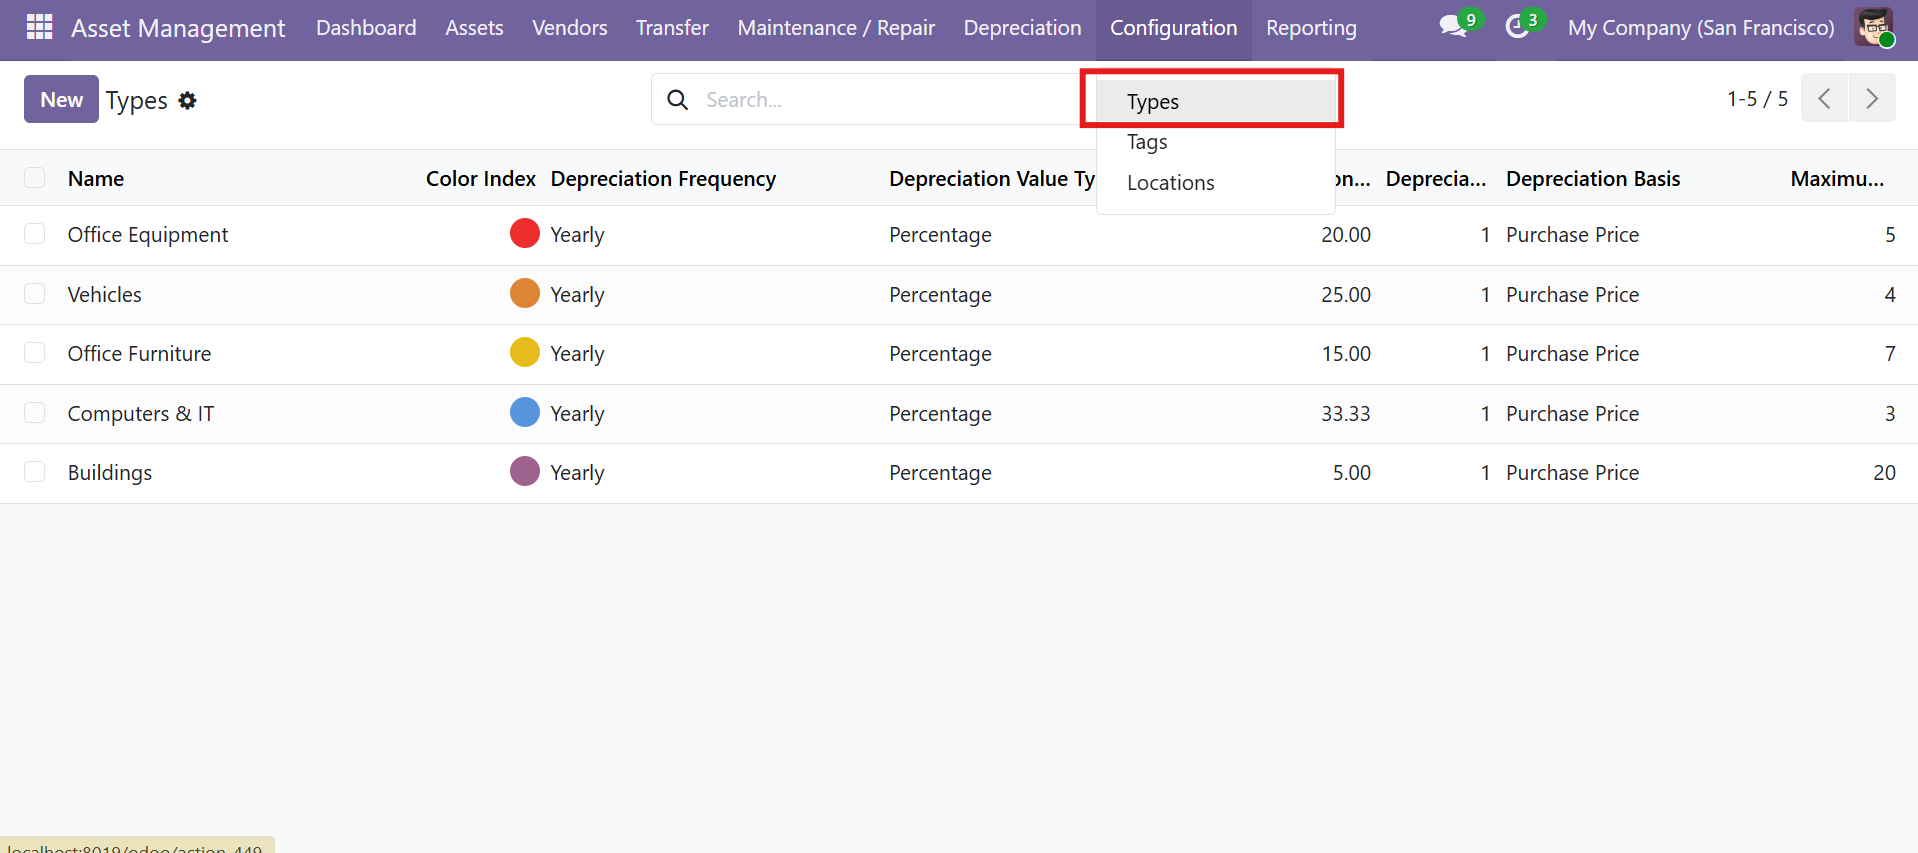
Each asset type defines:
| Field | Description |
|---|---|
| Name | Type name (e.g., "Office Equipment", "Vehicles") |
| Color | Color index for Kanban display |
| Depreciation Frequency | Monthly, Yearly, or Days |
| Depreciation Method | Fixed (fixed amount) or Percentage (rate-based) |
| Depreciation Rate | Amount or percentage per period |
| Start Delay | Days/months to wait before first depreciation entry |
| Depreciation Basis | Real Value (original price) or Depreciation Value (current book value) |
| Max Entries | Maximum number of depreciation records (prevents over-depreciation) |
Demo Asset Types:
| Type | Rate | Frequency | Max Entries |
|---|---|---|---|
| Office Equipment | 20% | Yearly | 5 |
| Vehicles | 25% | Yearly | 4 |
| Office Furniture | 15% | Yearly | 7 |
| Computers & IT | 33.33% | Yearly | 3 |
| Buildings | 5% | Yearly | 20 |
2. Configure Locations
Navigate to Asset Management > Configuration > Locations to define your location hierarchy.
| Field | Description |
|---|---|
| Name | Location name (required, unique) |
| Parent | Parent location for hierarchy (e.g., Building > Floor > Room) |
| Stock Location | Linked Odoo stock.location (auto-created if not set) |
| Code | Short code/abbreviation |
| Complete Name | Computed hierarchical path (e.g., "HQ / Floor 2 / Room 201") |
When you save a location without a stock.location link, the module automatically creates a corresponding stock.location record in Odoo Inventory.
3. Configure Tags
Navigate to Asset Management > Configuration > Tags. Each tag has a Name (unique) and Color index. Tags appear on assets as colored badges in Kanban and list views.
Demo tags: High Value (red), Critical (orange), Office (yellow), Warehouse (green), Leased (blue).
Security & Access Control
The module provides 11 security groups organized into 5 functional areas with row-level record rules.
Security Groups
| Area | User Group | Admin Group |
|---|---|---|
| Assets | View/edit own assets | Full access to all assets |
| Transfers | Manage own transfers | Full access to all transfers |
| Maintenance | Log own maintenance | Full access to all maintenance |
| Depreciation | View own depreciation | Full access to all depreciation |
| Vendors | View own vendors | Full access to all vendors |
A separate Reporting Admin group provides access to all reporting views.
Record Rules
- User groups: Users see only records they created -
[('create_uid', '=', user.id)] - Admin groups: Admins see all records -
[(1, '=', 1)]
Assign appropriate security groups to users before they begin working with assets. Users without proper group assignments will not see the Asset Management menu.
Contact SDLC Corp at sdlccorp.com/contact-us or email sales@sdlccorp.com